Elle and I used to be obsessed with making friendship bracelets. We would sell them for like 25 cents to our parents. Our parents used to get really annoyed because we were always taking their quarters and using it to buy string. It was funny because we only knew how to braid the string together—we didn’t know how to do any of those fancy friendship bracelets with beads and special knotting, so the bracelets we made weren’t that cool… So, when I saw that link in Elle’s post, I thought: OMG I have to do a blog about those!!
You can get the ribbon and string for this friendship bracelet (tutorial photo from P.S. I Made This) at WalMart or any craft store. I love the orange and pink version—it’s so cute!
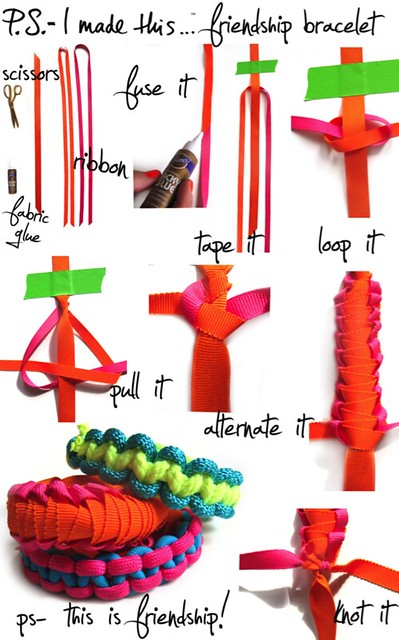
Above is a step-by-step photo tutorial on how to make these cute bracelets from P.S. I Made This. Also, I have pasted the first few steps of the instructions for you below, which explain the photo tutorial above from P.S. I Made This...
- Cut 3 pieces of ribbon or colorful rope. Cut 12 inches for base. Ribbon A & B should each be 3 feet, or 1 yard each (these are the ribbons you will be braiding around the “base”)
- Fuse together the ends of the 2 colors of ribbon with a small drop of glue. Do not start using ribbons until completely dry.
- Tape down the shorter center ribbon on a steady and flat surface.
For the rest of the instructions, click here!
Or another bracelet idea is to braid together your favorite three colors of string and loop on a few charms.
Or another bracelet idea is to braid together your favorite three colors of string and loop on a few charms.
No comments:
Post a Comment